디자인 패턴 톺아보기 - Command Pattern
Updated:
1. 커맨드 패턴(Command Pattern) 이란?
GOF 에서 말하는 커맨드 패턴의 목적은 아래와 같습니다.
Encapsulate a request as an object, thereby letting you parameterize clients with different requests, queue or log requests, and support undoable operations.
요정 자체를 캡슐화하는 것입니다. 이를 통해 요청이 서로 다른 사용자를 매개변수로 만들고, 요청을 대기시키거나 로깅하며, 되돌릴 수 있는 연산을 지원합니다.
1.1. 구조
Sample / Sequence Diagram
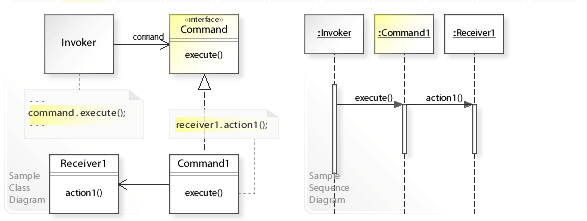
- Command
- 연산 수행에 필요한 인터페이스를 선언합니다.
- ConcreteCommand
- Receiver 객체와 액션 간의 연결성을 정의합니다. 또한 처리 객체에 정의된 연산을 호출하도록 Execute를 구현합니다. 앞서 정의한 PasteCommand, OpenCommand를 예로 들 수 있습니다.
- Client
- 객체를 생성하고 처리 객체로 정의합니다.
- Invoker
- 명령어에 처리를 수행할 것을 요청합니다.
- Receiver
- 요청에 관련된 연산 수행 방법을 알고 있습니다. 어떤 클래스도 요청 수신자로서 동작할 수 있습니다.
1.2. 사용 방법
- 사용자는 ConcreteCommand 객체를 생성하고 이를 수신자로 지정합니다.
- Invoker 클래스는 Concrete 객체를 저장합니다.
- Invoker 클래스는 command 에 정의된 Exectue()를 호출하여 요청을 발생시킵니다. 명령어가 취소 가능한 것이라면 ConcreteCommand는 이전에 Execute() 호출 전 상태의 취소 처리를 위해 저장합니다.
- ConcreteCommand 객체는 요청을 실제 처리할 객체에 정의된 연산을 호출합니다.
1.3. 장/단점
- Advantages (+)
- Makes adding new commands easy.
- Makes exchanging commands easy.
- Disadvantages (–)
- Additional level of indirection.
1.4. 고려사항
- Consider the left design (problem):
- Hard-wired request.
- Consider the right design (solution):
- Encapsulated request.
2. 커맨드 패턴(Command Pattern) 사용예시
커맨드 패턴은 다음 경우에 사용합니다.
- 수행한 동작을 객체로 매개변수화하고자 할 때
- 서로 다른 시간에 요청을 명시하고, 저장하며, 실행하고 싶을 때
- 실행 취소 기능을 지원하고 싶을 때
- 시스템이 고장 났을 때 재적용이 가능하도록 변경 과정에 대한 로깅을 지원하고 싶을 때
- 기본적인 연산의 조합으로 만든 상위 수준 연산을 써서 시스템을 구조화하고 싶을 때
2.1. GOF 패턴
2.1.1. Command
interface Command {
	void execute();
}
2.1.2. ConcreteCommand
class Command1 implements Command {
	private Receiver1 receiver1;

	public Command1(Receiver1 receiver1) {
		this.receiver1 = receiver1;
	}

	public void execute() {
		System.out.println("Command1 : Performing (carrying out) the request ...");
		receiver1.operation();
	}
}

class Command2 implements Command {
	private Receiver2 receiver2;

	public Command2(Receiver2 receiver2) {
		this.receiver2 = receiver2;
	}

	public void execute() {
		System.out.println("Command2 : Performing (carrying out) the request ...");
		receiver2.operation();
	}
}
2.1.3. Client
public class Main{
	public static void main(String[] args) {
		Invoker invoker = new Invoker(new Command1(new Receiver1()));
		invoker.operation();

		Command command2 = new Command2(new Receiver2());
		invoker.setCommand(command2);
		invoker.operation();

	}
}
2.1.4. Invoker
class Invoker {
	private Command command;

	public Invoker(Command command) {
		this.command = command;
	}

	public void operation() {
		System.out.println("Invoker  : Calling execute on the installed command ...  ");
		command.execute();
	}

	public void setCommand(Command command) {
		this.command = command;
	}
}
2.1.5. Receiver
class Receiver1 {
	public void operation() {
		System.out.println("Receiver1: Hello World!");
	}
}

class Receiver2 {
	public void operation() {
		System.out.println("Receiver2: Hello World!");
	}
}
결과는 아래와 같습니다.
Invoker  : Calling execute on the installed command ...
Command1 : Performing (carrying out) the request ...
Receiver1: Hello World!
Invoker  : Calling execute on the installed command ...
Command2 : Performing (carrying out) the request ...
Receiver2: Hello World!
참고 자료
Leave a comment