디자인 패턴 톺아보기 - Bridge Pattern
Updated:
1. 브릿지 패턴(Bridge Pattern) 이란?
GOF 에서 말하는 브릿지 패턴의 목적은 아래와 같습니다.
Decouple an abstraction from its implementation so that the two can vary independently.
구현에서 추상을 분리하여, 이들이 독립적으로 다양성을 가질 수 있도록 합니다.
1.1. 구조
Sample / Sequence Diagram
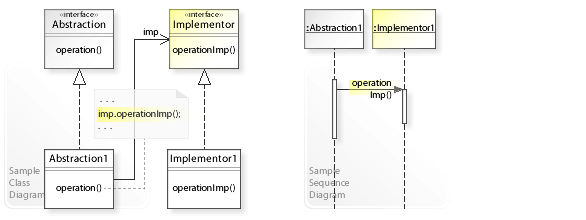
- Abstraction
- 추상적 개념에 대한 인터페이스를 제공하고 객체 구현자에 대한 참조자를 관리합니다.
- RefinedAbstraction
- 추상적 개념에 정의된 인터페이스를 확장합니다.
- Implementor
- 구현 클래스에 대한 인터페이스를 제공합니다. 다시 말해, 실질적인 구현을 제공해 서브클래스들에 공통적인 연산의 시그니처만을 정의합니다.
- 이 인터페이스는 Abstraction 클래스에 정의된 인터페이스에 정확하게 대응할 필요가 없습니다. 즉, 두 인터페이스는 서로 다른 형태일 수 있습니다. 일반적으로 Implementor 인터페이스는 기본적인 구현 연산을 수행하고, Abstraction은 더 추상화된 서비스 관점의 인터페이스를 제공합니다.
- ConcreteImplementor
- 인터페이스를 구현하는 것으로 실제적인 구현 내용을 담았습니다.
1.2. 사용 방법
- Abstraction 클래스가 사용자 요청을 Implementor 객체에 전달합니다.
1.3. 장/단점
- Advantages (+)
- Provides a flexible alternative to subclassing.
- Disadvantages (–)
- Introduces an additional level of indirection
1.4. 고려사항
- Consider the left design (problem):
- Implementation is coupled to the abstraction.
- Consider the right design (solution):
- Implementation is decoupled from the abstraction.
2. 브릿지 패턴(Bridge Pattern) 사용예시
브릿지 패턴은 다음 경우에 사용합니다.
- 추상적 개념과 이에 대한 구현 사이의 지속적인 종속 관계를 피하고 싶을 때, 이를테면, 런타임에 구현 방법을 선택하거나 구현 내용을 변경하고 싶을 때가 여기에 해당합니다.
- 추상적 개념과 구현 모두가 독립적으로 서브클래싱을 통해 확장되어야 할 때. 이때, 가교 패턴은 갭라자가 구현을 또 다른 추상적 개념과 연결할 수 있게 할 뿐 아니라, 각각을 독립적으로 확장 가능하게 합니다.
- 추상적 개념에 대한 구현 내용을 변경하는 것이 다른 관련 프로그램에 아무런 영향을 주지 않아야 할 때
- 클래스 계통에서 클래스 수가 급증하는 것을 방지하고자 할 때
- 여러 객체들에 걸쳐 구현을 공유하고자 하며, 또 이런 사실을 사용자 쪽에 공개하고 싶지 않을 때
2.1. GOF 패턴
2.1.1. Abstraction
interface Abstraction {
	String operation() ;
}
2.1.2. RefinedAbstraction
class RefinedAbstraction implements Abstraction {
	private Implementor imple;

	public String operation() {
		return "RefinedAbstraction is Created!\n" + imple.operationImpl();
	}

	public RefinedAbstraction(Implementor imple) {
		this.imple = imple;
	}
}
2.1.3. Implementor
interface Implementor {
	String operationImpl();
}
2.1.4. ConcreteImplementor
class ConcreteImplementor implements Implementor {
	public String operationImpl() {
		return "ConcreteImplementor is Created!";
	}
}
2.1.5. Main
public class Main{
	public static void main(String[] args) {
		Abstraction abstraction = new RefinedAbstraction(new ConcreteImplementor());
		System.out.println(abstraction.operation());
	}
}
결과는 아래와 같습니다.
RefinedAbstraction is Created!
ConcreteImplementor is Created!
번외로 이해를 돕기위해 예제를 알아보겠습니다. 건물을 지을 때 어떤 재료를 사용할 지 Bridge 패턴을 이용해서 만들어 보겠습니다.
interface Building {
	String build() ;
}

class Bank implements Building {
	private Door door ;

	public Bank(Door door) {
		this.door = door;
	}

	public String build() {
		return "Bank is Build the Door is : [" + door.operation() + "]";
	}
}

class Hospital implements Building {
	private Door door ;

	public Hospital(Door door) {
		this.door = door;
	}

	public String build() {
		return "Hospital is Build the Door is : [" + door.operation() + "]";
	}
}

abstract class Door {
	abstract String operation() ;
}

class SteelDoor extends Door {
	public String operation () {
		return "Steel " + this.security();
	}

	public String security() {
		return "it has Security" ;
	}
}

class GlassDoor extends Door {
	public String operation () {
		return "Glass";
	}
}

public class Main{
	public static void main(String[] args) {
		Building bank = new Bank(new SteelDoor());
		Building hospital = new Hospital(new GlassDoor());
		System.out.println(bank.build());
		System.out.println(hospital.build());
	}
}
결과는 다음과 같습니다.
Bank is Build the Door is : [Steel it has Security]
Hospital is Build the Door is : [Glass]
참고 자료
Leave a comment